Google Analytics 4 (GA4) is here, and it’s a game-changer for understanding user behavior on your e-commerce store. But for Magento 2 users, integrating GA4 and ensuring accurate data collection can seem like a daunting task. That’s where a dedicated Magento 2 GA4 extension comes in.
This post will walk you through what these extensions do, the crucial features to look for, and a general setup flow to get you started.
What a Magento 2 GA4 Extension Does
In a nutshell, a GA4 extension for Magento 2 acts as a bridge, automatically sending crucial Enhanced Ecommerce events from your store to Google Analytics 4 without the need for complex manual coding. This means you can focus on analyzing data, not on the nitty-gritty of implementation.
Typically, a robust GA4 extension will support a wide array of tracking capabilities:
- Pageview & Session Tracking: The foundational data for understanding user engagement.
- Purchase Events: Accurately tracks revenue, tax, shipping, and item-level details for every completed sale.
- Add to Cart / Remove from Cart: Essential for understanding customer intent and identifying potential drop-off points.
- View Item / View Item List / Select Item: Provides insights into product browsing behavior, helping you optimize product pages and categories.
- Checkout Events by Step: Allows you to pinpoint where users are abandoning the checkout process.
- Refund Tracking: (Supported by some extensions) Crucial for a complete picture of your store’s financial performance.
- Google Consent Mode (V2): Ensures compliance with privacy regulations by adjusting data collection based on user consent.
- Google Tag Manager (GTM) / GA4 Direct Integration: Offers flexibility in how you manage your GA4 implementation.
- Server-Side Tagging Support: (Often a premium feature) Enhances data accuracy and can improve site performance by moving tagging logic off the user’s browser.
Understanding how users browse product lists and categories doesn’t start with analytics alone. A well-structured HTML sitemap helps users discover categories, products, and key CMS pages more efficiently, creating clearer navigation paths that later show up as meaningful View Item List and Select Item events in GA4 reports.
Key Features of a Magento 2 GA4 Module You Should Look For
When you’re evaluating a Magento 2 GA4 extension, keep an eye out for these vital features to ensure you’re getting the most out of your investment:
- Full GA4 Ecommerce Schema: This is critical! Ensure the extension correctly sends all relevant product data, including product ID, name, currency, quantity, and variants, to GA4. Incomplete data means incomplete insights.
- Compatibility with Latest Magento 2 Versions: Magento is constantly evolving. Your extension should be regularly updated to ensure seamless compatibility with the newest Magento 2 releases, preventing conflicts and ensuring stable performance.
- GTM-Friendly DataLayer Structure: Even if you start with direct GA4 integration, a well-structured dataLayer makes it incredibly easy to switch to Google Tag Manager later or integrate other marketing tools.
- Multi-store & Multi-currency Support: If your Magento setup involves multiple stores or currencies, the extension must be able to handle this complexity to provide accurate, consolidated data.
- Cookie Consent Compliance: With privacy regulations like GDPR and CCPA, robust cookie consent management is non-negotiable. Look for an extension that integrates with Google Consent Mode (V2) to ensure you’re compliant.
- Lightweight Script Loading (Speed Impact): Your store’s speed is paramount. Choose an extension that is optimized for performance, loading its scripts efficiently without negatively impacting your page load times.
- Debug Mode / Event Validation: A built-in debug mode or event validation tool is invaluable for troubleshooting. It allows you to see exactly what data is being sent to GA4 and helps identify any issues before they affect your live data.
- Optional Support for Google Ads & Remarketing: Many extensions go beyond GA4 and offer seamless integration with Google Ads for conversion tracking and remarketing audiences, simplifying your overall advertising efforts.
Popular Magento 2 GA4 Extension Providers
Choosing the right provider is as important as the features themselves. Below is a detailed breakdown of the most reliable developers in the Magento ecosystem, categorized by their strengths and pricing models.
Provider | Best For | Standout Features | Pricing (Approx.) |
BSS Commerce | Budget-Friendly | Simple direct GA4 integration (no GTM required for basic setup), easy for non-technical users. | $99 – $198 |
WeltPixel | The Gold Standard | Full GA4/GTM event coverage, Hyvä Theme compatibility, and robust server-side tracking (Pro version). | $249 – $399 |
Amasty | Advanced Users | Deep Google Ads integration, Enhanced Conversions, and multi-shipping checkout support. | ~$249+ |
Magefan | Entry Level/Pro | Offers a Free version for basic events; the Pro version adds server-side tracking and JSON exports. | $0 – $199 |
Mageplaza | All-in-One | Supports 60+ tag types, integrates with Facebook Pixel/TikTok, and focuses on marketing efficiency. | $141 – $331 |
BSS Commerce: Simplicity & Value
BSS Commerce offers a solid, mid-range Magento 2 Google Analytics 4 extension for store owners who want accurate data without a steep learning curve.
- Why it stands out: Their extension allows for Direct GA4 Integration. If you find Google Tag Manager too complex, you can simply plug in your Measurement ID and start tracking the five core e-commerce events immediately.
- Value: It is one of the most cost-effective paid options that still provides reliable support.
WeltPixel: The Industry Leader
WeltPixel’s GA4 extension is widely considered the most comprehensive on the market. It is specifically built for high-performance stores.
- Why it stands out: It provides ready-to-import JSON files for Google Tag Manager, which saves hours of manual configuration.
- Pro Advantage: Their Pro version includes Server-Side Tracking via Measurement Protocol, which ensures data is captured even if a user’s browser blocks scripts or if they close the “Thank You” page too early.
Amasty: Marketing Powerhouse
Amasty is known for feature-rich extensions that integrate deeply with the broader Google ecosystem.
- Why it stands out: Beyond standard GA4, it excels at Google Ads Enhanced Conversions. This allows you to send hashed first-party data (like email addresses) back to Google, significantly improving your ad attribution and ROI.
- Compatibility: It is fully compatible with the Hyvä checkout and custom storefronts.
Magefan: Scalable Solutions
Magefan offers a unique tiered approach, making it accessible for everyone from startups to enterprises.
- Why it stands out: They offer a free basic version that tracks essential pageviews and purchases. This is perfect for new stores testing the waters.
- Scalability: Their “Plus” and “Extra” versions add advanced features like tracking admin-created orders, refunds, and search terms.
Mageplaza: The Multi-Channel Tool
Mageplaza’s extension is geared toward merchants who run complex marketing campaigns across multiple platforms.
- Why it stands out: It isn’t just for GA4; it acts as a central hub for GTM, Facebook Pixel, and Pinterest. It includes a library of over 60 tag types, making it easy to add new tracking pixels without touching a single line of code.
Pro Tip: Before buying, always check the Release Notes on the provider’s site. Ensure the extension has been updated within the last 3–6 months to guarantee it supports the latest Magento security patches and GA4 schema changes.
Step-by-step guide for installing and configuring a Magento 2 GA4 module for Magento stores
Implementing a GA4 extension in Magento 2 is generally more efficient than manual coding because it automates the creation of the DataLayer—the essential layer of code that “talks” to Google.
Here is the step-by-step setup guide for a standard Magento 2 GA4 extension.
Step 1: Account Preparation (Google Side)
Before touching your Magento backend, ensure your tracking “buckets” are ready:
- Google Analytics 4: Create a GA4 property and a Web Data Stream. Copy your Measurement ID (starts with G-).
- Google Tag Manager (GTM): Create a GTM account and container. Copy your GTM ID (starts with GTM-).
- GTM API (Optional but Recommended): In GTM, go to Admin > User Management and ensure you have administrative access. Many extensions use the GTM API to automatically create tags for you.
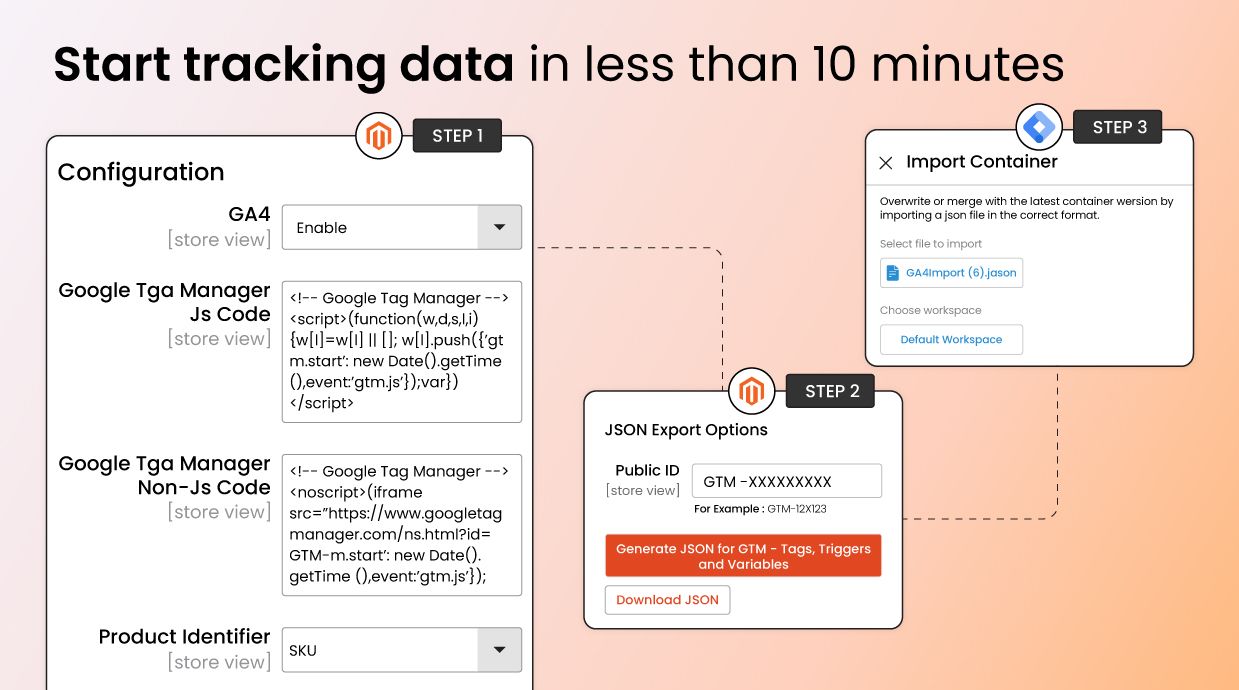
Step 2: Extension Installation & Activation
- Install: Use Composer (the industry standard) to install your chosen extension: composer require vendor/module-name bin/magento setup:upgrade
- Enable: Log into your Magento Admin and navigate to: Stores > Configuration > [Provider Name] > Google Analytics 4.
- General Settings: Set “Enable” to Yes.
Step 3: Connect IDs & GTM Integration
Most high-quality extensions offer a “one-click” GTM setup:
- Input IDs: Paste your Measurement ID and GTM Container ID into the designated fields.
- GTM API Connection: If your extension supports it, enter your GTM Account ID and Container ID.
- Generate JSON: Click the “Generate GTM JSON” button. This creates a file containing all the triggers (like “Add to Cart”) and tags needed for GA4.
- Import to GTM: * Go to your GTM Container > Admin > Import Container.
- Select the JSON file you just downloaded.
- Choose “Merge” (not Overwrite!) to keep any existing tags.
Step 4: Configure Ecommerce Tracking
Fine-tune how data is sent to GA4:
- Product Identifier: Choose whether to send the SKU or Product ID. (SKU is usually better for matching with Google Merchant Center).
- Brand & Category: Select the attribute you use for “Brand” (e.g., manufacturer) so it appears correctly in GA4 reports.
- Success Page: If you use a One-Step Checkout, ensure the extension is pointed to your custom success page URL so it doesn’t miss purchase events.
Step 5: Validation (The Most Important Step)
Never assume it’s working just because it’s “Enabled.”
- GTM Preview Mode: In GTM, click Preview. Enter your site URL. Perform an action (like adding a product to the cart). The GTM debug window should show the event “fired.”
- GA4 DebugView: In Google Analytics, go to Admin > Data Display > DebugView.
- Browse your site in a different tab.
- You should see a live stream of icons (circles for events, blue for page views).
- Click a purchase event to verify that the Value, Tax, and Currency are accurate.
Step 6: Go Live
- Submit GTM: Once validation is successful, go back to GTM and click Submit > Publish.
- Flush Magento Cache: Run bin/magento cache:flush one last time to ensure all scripts are loading for every visitor.
Final Thoughts
Switching to GA4 is not just a technical requirement—it’s an important opportunity for Magento 2 store owners to gain deeper, more actionable insight into customer behavior and store performance. A reliable Magento 2 GA4 extension ensures accurate tracking, structured ecommerce events, and compliance with Google’s latest standards, helping you measure what truly matters: conversions, user journeys, and revenue growth. Whether you’re optimizing marketing campaigns, improving UX, or scaling your business, GA4 data gives you the clarity to make smarter, data-driven decisions. If you haven’t implemented it yet, now is the right time to do it and future-proof your analytics.
Metrics from GA4 are only half the journey — the next step is turning insights into action. Leveraging top Magento 2 extensions for better SEO helps you translate behavioral data into structured improvements that search engines can reward.